• Skip to primary navigation
  • Skip to main content

Real Wood Paper

Real Wood Paper Logo

Where Creativity and Nature Unite

  • My Account
  • Cart
  • Contact
  • Home
  • Shop Real Wood Paper Products
    • Shop All Products
    • Shop By Size
      • 5″ x 7″ Sheets
        • 5″ x 7″ Aspen
        • 5″ x 7″ Birch
        • 5″ x 7″ Cherry
        • 5″ x 7″ Maple
        • 5″ x 7″ Walnut
        • 5″ x 7″ White Pine
        • 5″ x 7″ Sample Packs
      • 8.5″ x 11″ Sheets
        • 8.5″ x 11″ Aspen
        • 8.5″ x 11″ Birch
        • 8.5″ x 11″ Cherry
        • 8.5″ x 11″ Maple
        • 8.5″ x 11″ Walnut
        • 8.5″ x 11 White Pine
        • 8.5″ x 11″ Adhesive Backed Sheets
        • 8.5″ x 11″ Sample Packs
      • 11″ x 17″ Sheets
        • 11″ x 17″ Aspen
        • 11″ x 17″ Birch
        • 11″ x 17″ Cherry
        • 11″ x 17″ Maple
        • 11″ x 17″ Walnut
        • 11″ x 17 White Pine
        • 11″ x 17″ Exotic Wood Sheets
        • 11″ x 17″ Sample Packs
      • 12″ x 8″ Wood Panels
        • 12″ x 8″ Birch Panel
        • 12″ x 8″ Cherry Panels
        • 12″ x 8″ Maple Panels
        • 12″ x 8″ Walnut Panels
      • 18″ x 12″ Wood Panels
        • 18″ x 12″ Birch Panels
        • 18″ x 12″ Cherry Panels
        • 18″ x 12″ Maple Panels
        • 18″ x 12″ Walnut Panels
      • Sample Packs
    • Shop by Specie
      • See All Species
      • Aspen
        • 5″ x 7″ Aspen
        • 8.5″ x 11″ Aspen
        • 8.5″ x 11″ Aspen Adhesive Back
        • 11″ x 17″ Aspen
        • Aspen Sample Packs
        • Aspen Wood Envelope
      • Birch
        • 5″ x 7″ Birch
        • 8.5″ x 11″ Birch
        • 8.5″ x 11″ Birch Adhesive Back
        • 11″ x 17″ Birch
        • 12″ x 8″ Birch Panel
        • Birch Sample Packs
        • Birch Wood Envelope
      • Cherry
        • 5″ x 7″ Cherry
        • 8.5″ x 11″ Cherry
        • 8.5″ x 11″ Cherry Adhesive Back
        • 11″ x 17″ Cherry
        • 12″ x 8″ Cherry Panels
        • Cherry Sample Packs
        • Cherry Wood Bookmark
        • Cherry Wood Envelope
      • Maple
        • 5″ x 7″ Maple
        • 8.5″ x 11″ Maple
        • 8.5″ x 11″ Maple Adhesive Back
        • 11″ x 17″ Maple
        • 12″ x 8″ Maple Panels
        • Maple Sample Packs
        • Maple Wood Bookmark
        • Maple Wood Envelope
      • Walnut
        • 5″ x 7″ Walnut
        • 8.5″ x 11″ Walnut
        • 8.5″ x 11″ Walnut Adhesive Back
        • 11″ x 17″ Walnut
        • Walnut Sample Packs
        • Walnut Wood Bookmark
        • Walnut Wood Envelope
      • White Pine
        • 5″ x 7″ White Pine
        • 8.5″ x 11 White Pine
        • 8.5″ x 11″ White Pine Adhesive Back
        • 11″ x 17 White Pine
        • White Pine Sample Packs
        • White Pine Wood Envelope
      • Exotic & Variegated
        • Birds Eye Maple
        • Cats Eye
        • Curly Maple
        • Douglas Fir
        • Eastern Red Cedar
        • Ebony
        • Maple Burl
        • Olivewood
        • Rosewood
        • Wenge
        • Zebra
      • Sample Packs
    • Shop by Backing/Thickness
      • See All Backing/Thickness
      • Fleece Backed .010″
      • Adhesive Backed .013″
      • Paper Backed .016″
      • Wood Backed .025″
      • Wood Panels 1/16″
      • Wood Panels 1/8″
      • Sample Packs
    • Shop Accessories & Gifts
      • Gifts
      • Wood Bookmarks
      • Wood Envelopes
      • Remnants & Closeouts
  • Inspiration & Ideas
    • Design Idea Gallery
    • Tutorial Blog
    • Customer Showcase
    • DIY Wood Wedding
    • Cricut Settings for Cutting RWP
    • DIY Printing on Wood Paper
    • xTool S1 Wood Settings for RWP
  • FAQs
  • Contact

Paper Punch

DIY Wood Napkin Rings

Printing on Real Wood Paper

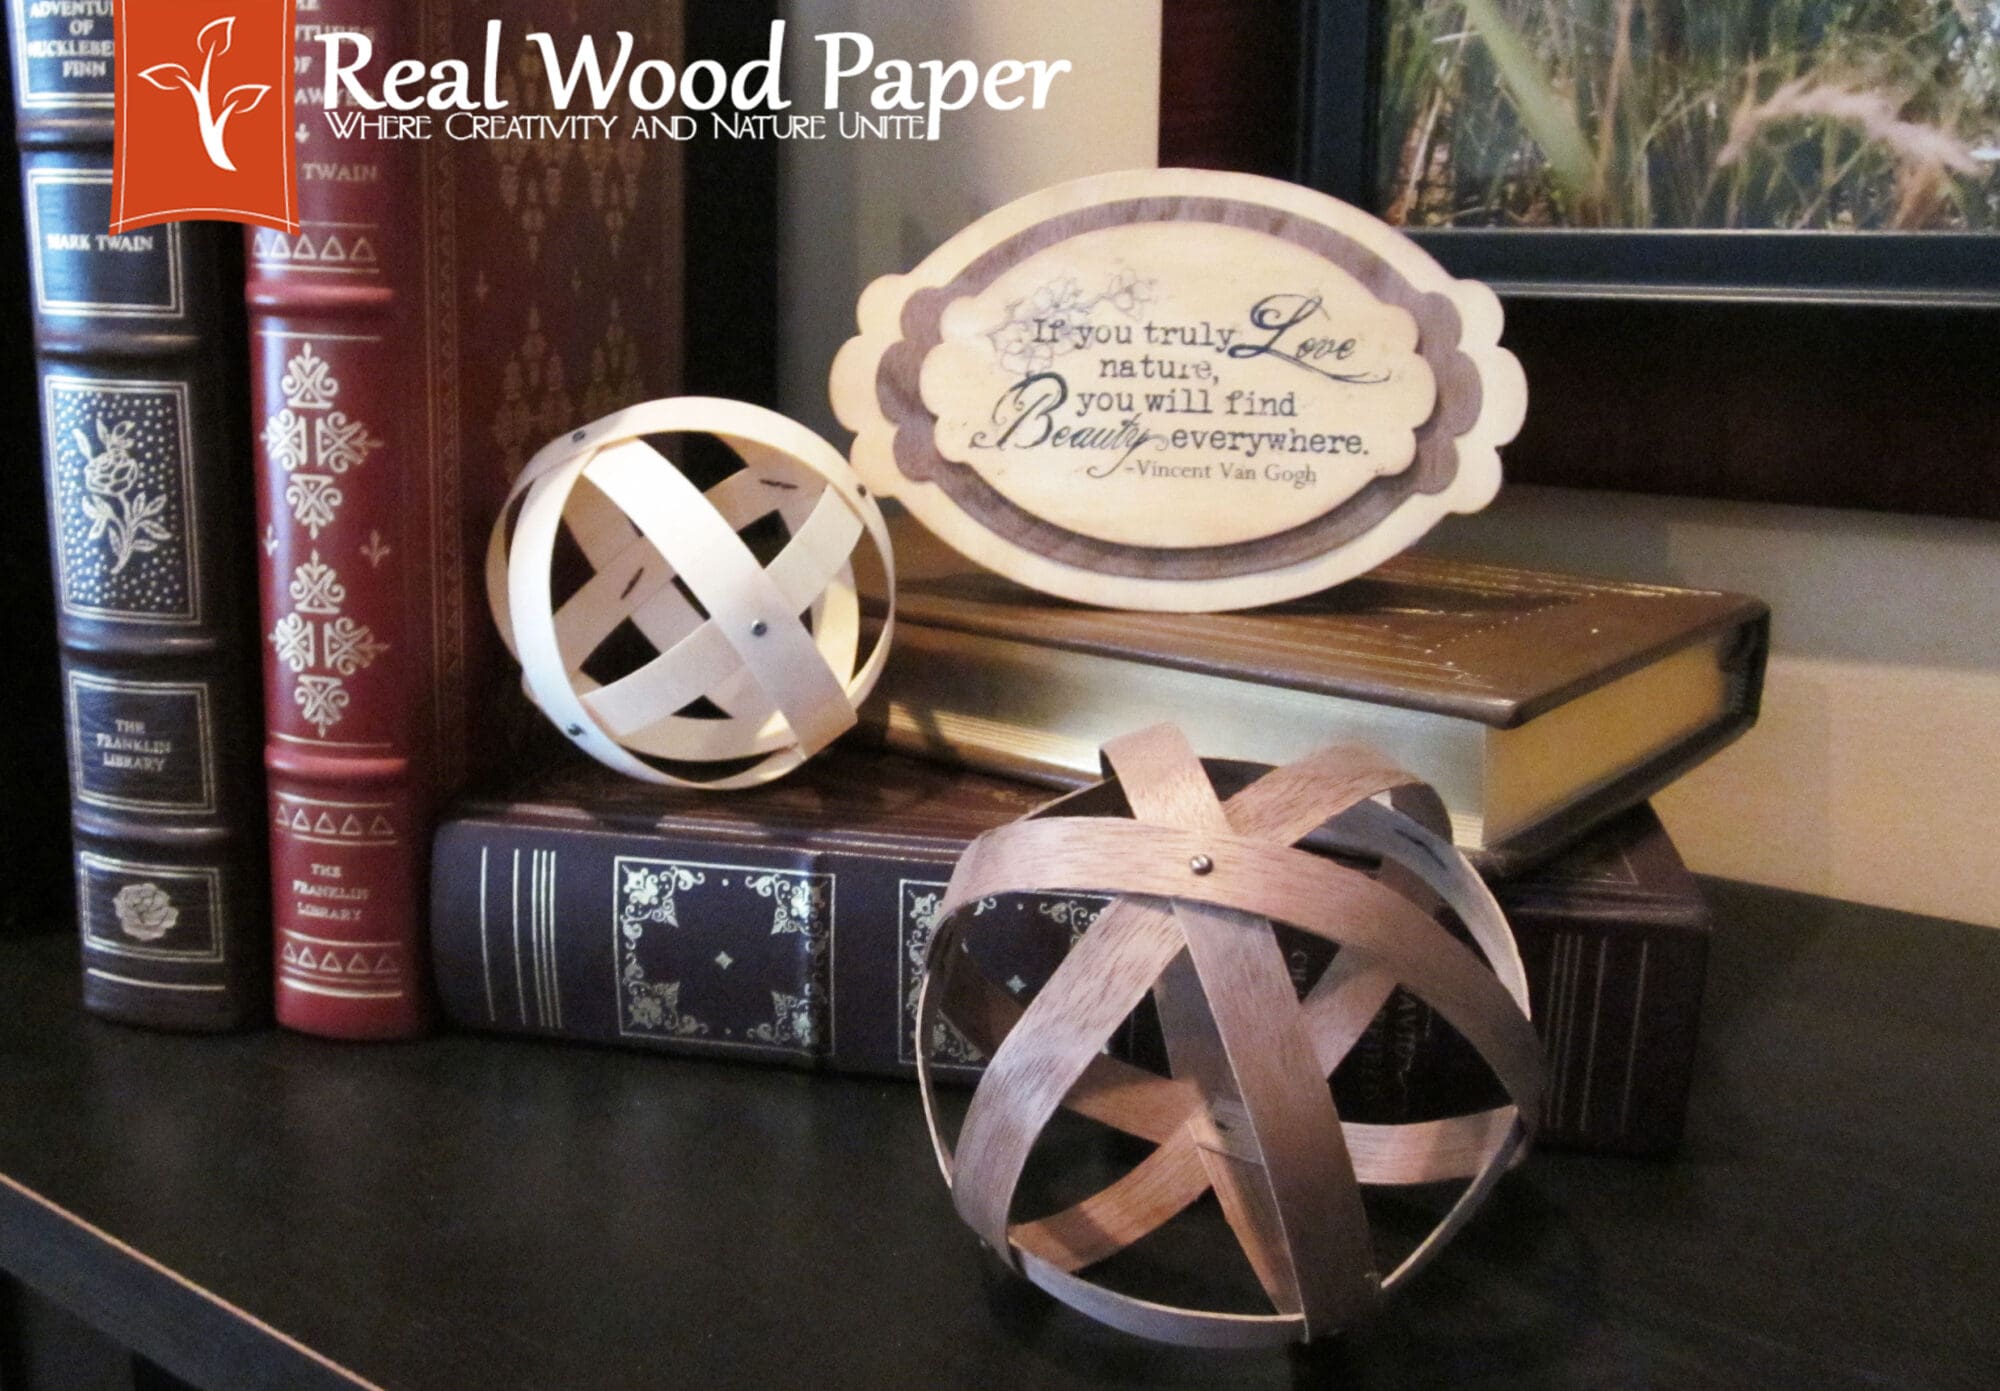
DIY Wood Napkin Rings!! These quick, easy and classy wooden napkin rings take just minutes to create!

Materials Needed:

  • Walnut .025″Thick Wood Backed Sheets 
  • Paper Cutter
  • Small Hole Punch
  • Brads
Walnut Wood Napkin Ring
DIY Walnut Wood Napkin Ring
Walnut Wood Napkin Rings
DIY Walnut Wood Napkin Rings

Cut strips of Walnut Wood Backed .025″ thick sheets into 2″ x 5″ pieces* with a standard paper cutter. Create a tube/ring and overlap the 5″ ends. Use a small circle hole paper punch and punch holes for the brads through the overlapped ends. Insert brads into holes and secure brads by folding metal ends. Done!

*Note: You do want to make sure the grain is going in the 2″ direction, not the 5″ direction (Short Grain) so that the wood is able to bend in the direction you need to make a ring. 

DIY Wood Napkin Rings

We hope you enjoyed this project. We invite you to share your Wood Napkin Ring photos with us. We’d love to see them!

DIY Wood Gift Tags and Labels

DIY-Hot-Cocoa-Gift-Tags

Tis the season to give gifts! And what better gifts to give and receive but yummy homemade treats!

Below is a materials list and the details with how we created Wood Gift Tags and Labels. While the tags and labels are similar looking, changing up the ribbon, jute, font and or paper punch design can make each a unique piece of art. 

Materials Used:

  • 8.5″ x 11″ Cherry .010″ thick Fleece back Short grain
  • 8.5″ x 11″ White Pine .010″ thick Fleece back Short grain
    • Other species available HERE
  • Computer & Laser Printer
  • .25″ Paper Punch
  • 2.5″ Round Paper Punch
  • 3″ Round Paper Punch
  • 3″ Scalloped Paper Punch
  • Beacon’s 3-in-1 Glue
  • Satin Ribbon
  • Natural Jute Cord
DIY Cookie Box Gift Tags
DIY Jelly Jar Gift Tags
DIY Muffin Wood Labels
DIY Hot Chocolate Jar Gift Tags

We used Word to create each set of words for our tags and labels. The key is to leave enough space around each set of words so that your paper punch doesn’t overlap and not make a complete circle. We used a standard HP Laser printer to print all the labels on the 8.5″ x 11″ White Pine Fleece Back sheet.  We punched out each set of words with a 2.5″ round paper punch. Using a 3″ Round or Scallop paper punch, we punched out all the backing pieces from a sheet of 8.5″ x 11″ Cherry Fleece Back sheet. To adhere the 3″ scalloped or round Cherry Wood Paper to the White Pine Wood Paper, we used Beacon’s 3-in1 Glue which can be purchased at any craft store or Amazon. At the top of the tags, we used a 1/4″ paper punched for a small round hole for the ribbon and natural jute.

Pumpkin Spice Muffins

Recipe Can Be Found At This Link

Macaroons

We purchased the macaroons from a local store.

Grape Jelly

We canned our own grape jelly from grapes on our property.

4 Jars of Hot Cocoa for Kids:

Mason jars with handles are filled with hot cocoa mix, crushed candy canes, mini chocolate chips and most importantly mini marshmallows! 

3 Jars of Hot Chocolate in Plaid Basket:

Classic Hot Cocoa – Unsweetened cocoa powder, sugar, powdered milk, chocolate chips and mini marshmallows.

Peppermint Hot Cocoa – Unsweetened cocoa powder, sugar, powdered milk, crushed candy canes, chocolate chips and mini marshmallows.

Mocha Hot Cocoa – Unsweetened cocoa powder, espresso powder, sugar, powdered milk, chocolate chips and mini marshmallows.

Pressed Flower Memorial Bookmarks

I lost my Dad just 5 weeks ago. While we are so very heartbroken, I wanted to make a keepsake for myself and family. I pressed flowers from his funeral with the intent of making wooden bookmarks. One morning it came to me. I needed to scan his signature onto the bookmarks. I had birthday cards he had given to various family members over the years. I was able to scan in a signature for each role he was to our family.

Love you, Bob
Love you, Dad
Love you, Grandpa Tossava

Husband. Brother. Father. Father-in-law. Grandfather.

Pressed Flower Memorial Wooden Bookmark

For the bookmark, I used .025″ Thick Cherry Wood Back Short Grain and cut them 3″ wide by 7″ long. You can cut them to any size you desire with a paper cutter, guillotine, scissors, sharp blade, etc. 

For the printed on circle cutouts, I used both .016″ Thick Maple Paper Back Short Grain and .016″ Thick Birch Paper Back Short Grain. I first printed them with a HP Envy Photo 7855 printer, then cut them out with a 2.5″ circle paper punch. Again, you can make them any size. This is what worked for me and my project. We do also have Pre-Cut Cherry Wood Bookmarks available, if you want to bypass all the cutting and just get to crafting.

Pressed Flower Memorial Bookmark Wooden

I would like to point out that all flowers are not good for pressing. While we did have a gorgeous assortment of roses that I would have loved to use, they are too big, bulky and do not press well. Roses are better preserved using silica gel, which I did do. Smaller, dainty flowers work best for pressing. I took a chance with the daisies but they turned out beautiful. Almost translucent after I ran them through the laminator.

I put all the flowers between sheets of printer paper and placed them in between pages of a huge dictionary I have. I waited about 2 weeks and they were ready to go.

For glue, my first go-to is always Beacon’s 3-in-1 Glue. You can purchase that from any craft store. I used if for the signature pieces and the flowers. I arranged each bookmark, glued everything in place and let them dry overnight. The next day I ran them through a laminator. You do not need an expensive or elaborate laminator. I used a very inexpensive laminator that I’ve had for over 10 years. I used a paper cutter to trim each bookmark down.

To say I was pleased with how this idea of a keepsake turned out for myself and family, would be an understatement.

DIY Thin Wooden Bookmark

Every sheet of Real Wood Paper is unique and beautiful in its own way. It is also extremely versatile and can be used for so many different projects, creations and art. Really, the only limit is your own imagination.

DIY Wooden Bookmark Idea
Wood bookmark cut with cricut
Real Wood Paper Wooden Faith Bookmark Cricut

Today, we pulled out the Cricut Maker, used scraps leftover from a previous project and created a fun wooden bookmark. We needed a quick project so why reinvent the wheel and create our own SVG file when there are so many already available for use on the Internet? We found this lovely Faith Cross SVG  at Hello SVG (Thank You!) and uploaded it to our Cricut Design Space.

After getting it to the perfect size, we grabbed a sheet of Cherry .010″ Fleece Back Short Grain Real Wood Paper and taped it down to the Cricut Mat with painters tape.  If you happen to come across this project and want to use one of our 2 other thicknesses the settings are all listed below for you.

Real Wood Paper Thickness: Fleece .010″ Thick
Cricut Blade: Premium Fine Point
Cardstock Setting
: Medium Cardstock – 80#
Pressure Setting: Default

Real Wood Paper Thickness: Paper .016″ Thick
Cricut Blade: Premium Fine Point
Cardstock Setting: Poster Board
Pressure Setting: More Pressure

Real Wood Paper Thickness: Wood .025″ Thick
Cricut Blade: Deep Point
Cardstock Setting: Natural Wood Veneer
Pressure Setting: Default

PRO TIP: Make sure your blades are new/sharp. Wood is hard on blades. For best results use new blades.

After it was cut and ready for assembly, the supplies used were:

Adhesive: Beacon’s 3-in-1
Layer 1 Wood: Aspen .025″ Wood Back Long Grain
Layer 2 Wood: Cherry .025″ Wood Back Short Grain
Misc. Supplies: Circle paper punch, ribbon

If you happen to make your own Real Wood Paper Bookmark, please share your creation with us! We would love to see it! You can contact and upload your photo, HERE.

DIY Wood Valentine Bookmarks

It’s time to start thinking about Valentine’s Day! Here’s a cute little DIY Bookmark project to get you thinking. 😍

Materials:
Cherry Wood Back 8.5″ x 11″ Sheet
Walnut Fleece Back 8.5″ x 11″ Sheet

Cutting board, scissors, Xacto knife, etc.
Heart paper punch
Small circle punch
Ribbon, twine, etc.
Favorite saying
Glue (we like Beacon’s 3-in-1 Glue)

In Photoshop or other graphic design program, layout your graphic/saying to print where you want on the sheet – 3 times. Print your saying/graphic on the Cherry Wood Back sheet with a laser printer (not an inkjet printer, the ink is too wet). Cut your Cherry wood sheet into desired bookmark size. Punch 3 Heart shapes out of Walnut Fleece Back sheet. Glue Walnut heart shapes in desired location on bookmark. Punch hole at top with small circle punch. insert ribbon. Easy as that!

DIY Wood Valentine Bookmarks

DIY Birthday Card w/ Wood Sign

Creating a unique, one of a kind Happy Birthday card for that special someone in your life makes for a memorable gift that will be cherished for years to come. As shown here, Real Wood Paper can be easily cut with die cuts (Sizzix Tim Holtz Bigz Die – Hanging Sign). We used 8.5″ x 11″ Maple Fleece Back Long Grain to create this adorable hanging sign. It was glued with Beacon’s 3 in 1 Glue to colorful cardstock and adorned with sweet little flowers.

happy birthday wood greeting card


DIY Real Wood Paper Roses & Anniversary Card

Looking for an easy yet stunning wood paper project? Wood Roses are the answer! The color combinations and variations are endless! You are only limited by your own imagination!

For this project you will be using our Fleece Back papers. We started with Aspen in the center, then Birch, then Cherry and finished with Walnut.

Wooden anniversary card

Materials Needed:

Aspen Fleece Back .010″ Thick Short Grain 8.5″ x 11″
Birch Fleece Back .010″ Thick Short Grain 8.5″ x 11″
Cherry Fleece Back .010″ Thick Short Grain 8.5″ x 11″
Walnut Fleece Back .010″ Thick Short Grain 8.5″ x 11″

Oval paper punch
Scissors
Glue – We used Beacons 3 in 1 but a glue gun would work as well
Small bowl of water
Paper towel or dish towel
Toothpick or other small round item to wrap wood around

Glue and paper punch used on real wood paper sheets
how to make a wood flower

Instructions:
Paper punch your ovals so the grain is going the length of your oval (this will allow the paper to curl the right direction).

Cut ovals in half and soak ovals in water for up to 1 minute.

Remove ovals from water and place on towel to drain excess water.

For the first center petal piece, carefully wrap a piece around the toothpick. When you have the desired size, apply glue to the bottom edge of the petal. For all other pieces, apply a bead of glue to the bottom (cut/straight edge) of the petal and wrap it around the previous petal. Continue layering until you have the desired look and size. You can create a rosebud all the way to a fully open rose just by creating space between the top of the previous layers petals as you glue the bottom to the base of the flower.

DIY Real Wood Paper Roses

DIY Wood Strip Spheres & Die Cutting Wood Sheets

Creating unique home decor items is quick and easy with Real Wood Paper. These 2 projects took no time at all.

For our DIY Wood Strip Spheres, we used 8.5″ x 11″ Birch Wood Back .025″ thick and 8.5″ x 11″ Walnut Wood Back .025″ thick wood sheets and mini brads. Cut strips into desired width, soak in water for a few minutes to increase flexibility and start bending. Using a small circle punch, punch a hole in the layers to attach them with a brad.

For our DIY Wood Sign, we printed our image on our 8.5″ x 11″ Birch Paper Back .016″ thick. Our paper back sheets are slightly textured which is great for adhering to another sheet of wood or cardstock. Using Spellbinder Dies and Sizzix Die Cutting Machine, we cut 3 different sizes using 8.5″ x 11″ Birch Paper Back .016″ thick, 8.5″ x 11″ Walnut Paper Back .016″ thick, and 8.5″ x 11″ Walnut Wood Back .025″ thick. We like to use Beacon’s 3 in 1 Advanced Craft Glue to adhere our wood sheets together. We then cut a little triangle to use as a stand on the back of our sign.

Real Wood Paper Wood Strip Sheres and die cutting wood veneer sheets

Real Wood New Years Ball

Happy 2019 from All of Us at Real Wood Paper! We look forward to this New Year and all the possibilities to come! 2018 was filled with many changes and much growth. 2019 can only be even better with our larger work space  and expanded product lines.

Walnut Wood Veneer Sphere Ball

For this project, we created our very own New Years Eve Ball to drop. We used a mix of our Walnut .025″ Wood Back 11″ x 17″ Short Grain and Long Grain. Short Grain added flexibility and Long Grain added strength. We cut the sheets into 2″ strips. We glued the long grain to the back of the short grain and staggered them so the strip ends did not line up with each other creating long strips that had the perfect amount of flex and strength to create the ball. Suspend a beautiful snowflake ornament and you have your very own DIY Real Wood Paper Ball.

INSTA GRAM

✨ Wood Wedding Save the Date Stickers ✨ Add a ✨ Wood Wedding Save the Date Stickers ✨

Add a natural, elegant touch to your wedding stationery with real wood veneer stickers! Perfect for sealing envelopes, accenting cards, or including a custom tag with your invitation for guests to place on their calendar as a reminder.

Choose from our flexible, adhesive-backed wood sheets to create unique designs that set the tone for your special day.

https://www.realwoodpaper.com/product-category/adhesive/

www.RealWoodPaper.com

#realwoodpaper #woodstickers #weddingstationery #woodwedding #woodveneer #rusticwedding #weddingınspo #savethedates
✨ Inspiration for your next handmade card ✨ Re ✨ Inspiration for your next handmade card ✨
Real Wood Paper thin sheets make the perfect base for creating one-of-a-kind greeting cards. This sample card showcases how the natural grain and warm tones of real wood can turn a simple card into a memorable keepsake.

Whether you’re crafting for weddings, birthdays, or special notes, our micro-thin wood sheets give you a beautiful, natural canvas to make it your own.

www.realwoodpaper.com

#realwoodpaper #woodpaper #handmadecard #handmadecards #woodcard #woodart #woodveneer
Happy World Art Day! 🎨🌍 Today we’re celeb Happy World Art Day! 🎨🌍

Today we’re celebrating creativity with this stunning dimensional angel art, crafted on our Aspen Real Wood Paper. ✨

With a delicate white body and flowing gold wings, this framed piece blends the natural beauty of wood with the elegance of handmade design.

Real wood. Real art. Real beauty. 💛
www.RealWoodPaper.com

#worldartday #worldartday2025 #woodart #realwoodpaper #aspenwood #handmadeart #angelart
🌍🎨 Happy World Art Day! 🎨🌍

Today we’re celebrating creativity with this stunning dimensional angel art, crafted on our Aspen Real Wood Paper. ✨

With a delicate white body and flowing gold wings, this framed piece blends the natural beauty of wood with the elegance of handmade design.

Real wood. Real art. Real beauty. 💛
www.RealWoodPaper.com

#worldartday #worldartday2025 #woodart #realwoodpaper #aspenwood #handmadeart #angelart
Real Wood Bookmarks Crafted from genuine wood vene Real Wood Bookmarks
Crafted from genuine wood veneer, our wood bookmark blanks are perfect for laser engraving, painting, or personalizing with your own creative touch! Available as a blank, with pre-punched holes, or complete with a classic cream-colored tassel. They make a beautiful, eco-friendly addition to any book lover’s collection.

📚 Great for:
✔️ Custom gifts & wedding favors
✔️ Engraving & crafting projects
✔️ Personalized branding & business giveaways

Add a touch of nature to your next read! 
www.RealWoodPaper.com

#realwoodpaper #woodpaper #woodblanks #bookmarksforsale #bookmarkshandmade #bookmarksofinstagram #diybookmark #woodcraft
Follow on Instagram

Real Wood Paper

Real Wood Paper is a Woman-Owned Business with a passion for the natural beauty of wood and trees. Based in Michigan, we proudly offer Made in USA real wood veneer paper, sheets, thick panels, bookmarks, postcards, and envelopes. We also feature a selection of sustainably sourced wood products from around the world, such as exquisite Olivewood Pens.

Our mission is to inspire creativity by uniting nature and art, offering unique materials that celebrate the distinct character of each piece of wood. Discover our premium products and let your projects reflect the unparalleled beauty of nature.

About Us

Our Story

Inspiration

Blog

Client Showcase

DIY Wedding

Gallery

Social:

Helpful Info

  • Contact Us
  • Coupon Codes
  • Custom Quote
  • Customer Testimonials & Reviews
  • FAQ’s & Info
  • Newsletter Signup
  • Shipping Information & Returns
  • Sitemap
  • Terms & Conditions

© 2025 • Real Wood Paper • All Rights Reserved • Accessibility Statement • Website Design & SEO Services by Pixelvine Creative

MENU
  • Home
  • Shop Real Wood Paper Products
    • Shop All Products
    • Shop By Size
      • 5″ x 7″ Sheets
        • 5″ x 7″ Aspen
        • 5″ x 7″ Birch
        • 5″ x 7″ Cherry
        • 5″ x 7″ Maple
        • 5″ x 7″ Walnut
        • 5″ x 7″ White Pine
        • 5″ x 7″ Sample Packs
      • 8.5″ x 11″ Sheets
        • 8.5″ x 11″ Aspen
        • 8.5″ x 11″ Birch
        • 8.5″ x 11″ Cherry
        • 8.5″ x 11″ Maple
        • 8.5″ x 11″ Walnut
        • 8.5″ x 11 White Pine
        • 8.5″ x 11″ Adhesive Backed Sheets
        • 8.5″ x 11″ Sample Packs
      • 11″ x 17″ Sheets
        • 11″ x 17″ Aspen
        • 11″ x 17″ Birch
        • 11″ x 17″ Cherry
        • 11″ x 17″ Maple
        • 11″ x 17″ Walnut
        • 11″ x 17 White Pine
        • 11″ x 17″ Exotic Wood Sheets
        • 11″ x 17″ Sample Packs
      • 12″ x 8″ Wood Panels
        • 12″ x 8″ Birch Panel
        • 12″ x 8″ Cherry Panels
        • 12″ x 8″ Maple Panels
        • 12″ x 8″ Walnut Panels
      • 18″ x 12″ Wood Panels
        • 18″ x 12″ Birch Panels
        • 18″ x 12″ Cherry Panels
        • 18″ x 12″ Maple Panels
        • 18″ x 12″ Walnut Panels
      • Sample Packs
    • Shop by Specie
      • See All Species
      • Aspen
        • 5″ x 7″ Aspen
        • 8.5″ x 11″ Aspen
        • 8.5″ x 11″ Aspen Adhesive Back
        • 11″ x 17″ Aspen
        • Aspen Sample Packs
        • Aspen Wood Envelope
      • Birch
        • 5″ x 7″ Birch
        • 8.5″ x 11″ Birch
        • 8.5″ x 11″ Birch Adhesive Back
        • 11″ x 17″ Birch
        • 12″ x 8″ Birch Panel
        • Birch Sample Packs
        • Birch Wood Envelope
      • Cherry
        • 5″ x 7″ Cherry
        • 8.5″ x 11″ Cherry
        • 8.5″ x 11″ Cherry Adhesive Back
        • 11″ x 17″ Cherry
        • 12″ x 8″ Cherry Panels
        • Cherry Sample Packs
        • Cherry Wood Bookmark
        • Cherry Wood Envelope
      • Maple
        • 5″ x 7″ Maple
        • 8.5″ x 11″ Maple
        • 8.5″ x 11″ Maple Adhesive Back
        • 11″ x 17″ Maple
        • 12″ x 8″ Maple Panels
        • Maple Sample Packs
        • Maple Wood Bookmark
        • Maple Wood Envelope
      • Walnut
        • 5″ x 7″ Walnut
        • 8.5″ x 11″ Walnut
        • 8.5″ x 11″ Walnut Adhesive Back
        • 11″ x 17″ Walnut
        • Walnut Sample Packs
        • Walnut Wood Bookmark
        • Walnut Wood Envelope
      • White Pine
        • 5″ x 7″ White Pine
        • 8.5″ x 11 White Pine
        • 8.5″ x 11″ White Pine Adhesive Back
        • 11″ x 17 White Pine
        • White Pine Sample Packs
        • White Pine Wood Envelope
      • Exotic & Variegated
        • Birds Eye Maple
        • Cats Eye
        • Curly Maple
        • Douglas Fir
        • Eastern Red Cedar
        • Ebony
        • Maple Burl
        • Olivewood
        • Rosewood
        • Wenge
        • Zebra
      • Sample Packs
    • Shop by Backing/Thickness
      • See All Backing/Thickness
      • Fleece Backed .010″
      • Adhesive Backed .013″
      • Paper Backed .016″
      • Wood Backed .025″
      • Wood Panels 1/16″
      • Wood Panels 1/8″
      • Sample Packs
    • Shop Accessories & Gifts
      • Gifts
      • Wood Bookmarks
      • Wood Envelopes
      • Remnants & Closeouts
  • Inspiration & Ideas
    • Design Idea Gallery
    • Tutorial Blog
    • Customer Showcase
    • DIY Wood Wedding
    • Cricut Settings for Cutting RWP
    • DIY Printing on Wood Paper
    • xTool S1 Wood Settings for RWP
  • FAQs
  • Contact